Docker, Docker, Docker! During the last few years, I hear this name more and more in books and articles and in all the conferences and tech meetups that I attend. The arrival of Docker has been welcomed by the community with open arms and it has instantly become a hit. The Docker ecosystem has been rapidly expanding with many other companies providing services, support, and complimenting frameworks such as Apache Mesos and Amazon Elastic Beanstalk, just to name a few. Even Microsoft has embraced the technology and is working on providing Docker support in their Azure Cloud service. It goes to show !
In this short post, I would like show how to pack a JBoss EAP 6.4.0 platform using Docker images/containers.
JBoss EAP 6.4.0 is a Java EE 6 compliant application server, probably one of the most known on the application servers market, together with IBM WebSphere and Oracle WebLogic. It is an open-source application server maintained and distributed by RedHat and its community counterpart is Wildfly. While Docker has been used since a while to package Wildfly distributions, packaging JBoss EAP with Docker is something more recent, hence this blog ticket.
A quite natural packaging of a JBoss EAP platform consists in two Docker images, one hosting the application server itself and the second the associated database, as shown below :
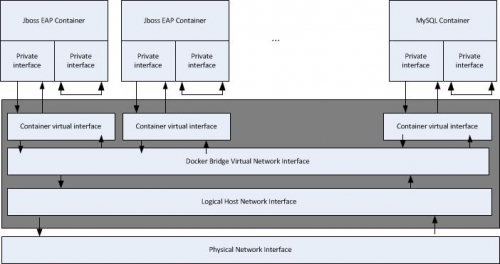
As the figure above is showing, the platform is packaged using n+1 containers, where n is the number of the JBoss EAP application servers, and the additional container is hosting the MySQL server instance. JBoss EAP requires a database for its internals. For licencing reasons, it comes with the H2 database, which is a Java in-memory database, usefull for rapid prototyping, but which has to be replaced with a production-ready databse server, as soon as we start to do more serious stuff. Here, we have chosen MySQL or, more precisely, MariaDB.
All the containers are bridged, having a loopback network interface and a private network interface connected to the host through the network bridge. This way, any container can connect to any other but none can connect to the host and the host cannot connect to any container.
Here are the step to be performed in order to build this architecture :
- Get the JBoss EAP 6.4.0 Docker image from DockerHub.
docker pull docker.io/dboss/docker-jboss-eap
- Get the MariaDB image from DockerHub
docker pull docker.io/mysql
- Make sure that the images above have been pulled out and are present on the local host
docker images
- Run a MySQL Server container based on the docker.io/mysql image
docker run -d --name mysqld --expose 3306 –e MYSQL_ROOT_PASSWORD=password docker.io/mysql:latest
- Make sure that the MariaDB container is running
docker ps
- Attach an interactive terminal session to the MariaDB container. This operation is supposed to be done via the docker attach but, for some reason, the release I’m using (1.10.3 on CentOS 7) gets stuck while running this command. In order to work-around I’m using the following :
docker exec –it mysqld /bin/bash
- In the current bash session, connect to the MariaDB server via the mysql client and create a new database named test.
mysql –u root –p password
mysql>show databases;
…
mysql>create database jbossdb;
mysql>quit
- You just created a new MySQL database. Now you may exit the bash session and commit a new Docker image containing this new databse you just added.
docker commit –m «Have added a new test database»
-a «Nicolas DUMINIL <nicolas.duminil@simplex-software.fr»
mysqld docker.io/mysql:testdb
- Using the command docker images you can check whether the new image, identified by io:mysql:testdb, has been created
- Now that the database server is running and that the databse jbossdb has been created, it’s time to start a second container to configure and run JBoss EAP.
docker --name jboss-eap-6.4.0 –p 8080:8080
–p 9990:9990 /opt/jbossas/bin/standalone.sh
–b 0.0.0.0 –bmanagement=0.0.0.0
- Using the command docker ps you can check whether the container named jboss-eap-6.4.0 is running. Now, you need to create a new management user.
/opt/jbossas/bin/add-user.sh
The script add-user.sh will guide you to create the new user. Once done, you will be abale to connect to the JBoss EAP Admionisration Console, at localhost :8080, using the new created user.
- Modify the application server configuration such that to add the required modules for the MySQL Server. The following directory structure and files need to be added to the /opt/jbossas/modules
/opt/jbossas
|
|-- modules
|
|-- com
|
|-- mysql
|
|-- main
|
|-- module.xml
|-- mysql-connector-java-5.1.20.jar
And the module.xml file is as follows :
<?xml version="1.0" encoding="UTF-8" standalone="no"?>
<module xmlns="urn:jboss:module:1.0" name="com.mysql">
<resources>
<resource-root path="mysql-connector-java-5.1.20-bin.jar"/>
</resources>
<dependencies>
<module name="javax.api"/>
<module name="javax.transaction.api"/>
</dependencies>
</module>
- Modify the configuration files such that to remove the H2 database driver and datasources and to add the MySQL database drivers and datasources. The JBoss EAP platform may be executed in either domain or standalone mode. Additionally, there are five different profiles : standalone, standalone-full, standalone-ha, standalone-full-ha and standalone-osgi. Depending on the mode and on the profile you’ll be using to run the patform, you need to modify the associated configuration XML file. For example, for running JBoss EAP in standalone mode, the file to be modified id /opt/jbossas/standalone/configuration/standalone.xml. This could be done by either directly modifying this XML file using your prefered text editor, or by using JBoss CLI (CommandLine Interpreter). For example, the following CLI file will do the thing.
#Script to replace the H2 datasource by MySQL ones
connect
batch
# Default profile
# Remove the datasources and the H2 driver
data-source remove --name=ExampleDS
/subsystem=datasources/jdbc-driver=h2:remove
# Add MySQL JDBC driver
/subsystem=datasources/jdbc-driver=MySQL:add(
driver-name=MySQL,
driver-module-name=com.mysql,
driver-xa-datasource-class-name=com.mysql.jdbc.jdbc2.optional.MysqlXADataSource
)
# Add a non-XA datasource
data-source add
--name=ExampleDS
--driver-name=MySQL
--jndi-name=java:jboss/datasources/ExampleDS
--connection-url=jdbc:mysql://localhost:3306/test
--user-name=root
--password=California1
--max-pool-size=25
data-source enable --name=ExampleDS
# Add an XA datasource
xa-data-source add
--name=ExampleXADS
--driver-name=MySQL
--jndi-name=java:jboss/datasources/ExampleXADS
--user-name=root
--password=California1
--recovery-username=root
--recovery-password=California1
--use-ccm=false
--max-pool-size=25
--blocking-timeout-wait-millis=5000
--new-connection-sql="set datestyle = ISO, European;"
/subsystem=datasources/xa-data-source=ExampleXADS/xa-datasource-properties=ServerName:add(value=localhost)
/subsystem=datasources/xa-data-source=ExampleXADS/xa-datasource-properties=PortNumber:add(value=3306)
/subsystem=datasources/xa-data-source=ExampleXADS/xa-datasource-properties=DatabaseName:add(value=test)
xa-data-source enable --name=ExampleXADS
# Execute and reload
run-batch
:reload - Commit all the modifications you just done
docker commit –m «Have configured MySQL drivers and datasources»
-a «Nicolas DUMINIL <nicolas.duminil@simplex-software.fr»
jboss-eap-6.4.0 docker.io/dboss/docker-jboss-eap:mysql
- Now, stop the jboss-eap-6.4.0 container and restart it linked to the mysqld container.
docker stop jboss-eap-6.4.0
docker --name jboss-eap-6.4.0 –p 8080:8080
--link mysqldb
–p 9990:9990 /opt/jbossas/bin/standalone.sh
–b 0.0.0.0 –bmanagement=0.0.0.0
Congratulations, you have now a full JBoss EAP 6.4.0 platform running on your host. For any additional application server you want to run, you need to create a new container from the same image docker.io/dboss/docker-jboss-eap :mysql. And if you want to share this new images, you can also push them back to DockerHub