One of the key factors in DEVOPS movement is Infrastructure As Code (IAC) which represents an important shift in mindset, according to which everything is code, including infrastructure. While there are currently many tools allowing to perform IAC, this article is focusing on one of the most interesting of them: Terraform from Hashicorp (https://www.terraform.io/). Terraform is an open source provisioning tool which allows the IAC developer to define and create infrastructures elements and to deploy them in different clouds, be them AWS, Azure or GC. Other similar tools exist, like Amazon CloudFormation but, as opposed to Terraform, this tool only works with AWS.
The sample presented here for illustration purposes is based on the Yevgeniy Brikman’s excellent book “Terraform Up & Running”, published by O’Reilly Media Inc. in march 2017.
IAC (Infrastructure As Code) is one of the hottest IT topics of the moment. The idea behind this concept is to write code that defines, creates, deploys and updates the required infrastructure, like servers, databases, networks, clusters, log files, applications, and so on. Not so long time ago, all these operations were done by a team of system and network engineers, called “OPS”, who used to set up racks and cabinets, install servers, wiring up networks and power systems, install and configure operating systems, etc. As opposed to those teams, other teams called “DEVS” were in charge for developing and building applications and to toss them over the wall to “OPS” who, in turn, were in charge to deploy and run them. Nowadays a profound shift takes place. Instead of investing money in hardware, organizations are moving to cloud technologies and take advantage of services like Amazon Web Services (AWS), Microsoft Azure or Google Cloud (GC). Instead of racking servers and plugging network cables, the OPS teams are spending their time working on tools like Chef, Puppet, Terraform, Ansible, Docker, Kubernets, etc. As a result, DEVS and OPS team merged into new structures called DEVOPS teams.
One of the key factors in DEVOPS movement is IAC which represents an important shift in mindset, according to which everything is code, including infrastructure. While there are currently many tools allowing to perform IAC, this article is focusing on one of the most interesting of them: Terraform from Hashicorp (https://www.terraform.io/). Terraform is an open source provisioning tool which allows the IAC developer to define and create infrastructures elements and to deploy them in different clouds, be them AWS, Azure or GC. Other similar tools exist, like Amazon CloudFormation but, as opposed to Terraform, this tool isn’t open source and only works with AWS.
The sample presented here for illustration purposes is based on the Yevgeniy Brikman’s excellent book “Terraform Up & Running”, published by O’Reilly Media Inc. in march 2017. It leverages the infrastructure presented in the figure below.
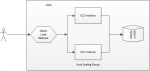
The presented architecture is one of the most common one in the World Wide Web technology. It consists in an Amazon Auto Scaling Group (ASG) containing a certain number of web servers. The particularity of an ASG is the ability to provide capacity on demand, which consists in spawning or suspending EC2 instances depending on different factors like workload, etc. Given that all the instances in an ASG are idempotent, existing instances might be suspended or new instances might be spawned at any moment, depending on conditions and policies. Consequently, the IP addresses of the EC2 instances change over the time. Accordingly, there is no a unique IP address that clients could use in order to invoke requests on the associated web servers. Hence the Amazon Elastic Load Balancer (ELB) which provides such an IP address to HTTP clients and distributes the underlying requests to one of the available web servers, on the EC2 instances. Such an infrastructure generally requires a lot of configuration and setting-up but, using AWS, it is only a matter of a couple of hours.
AWS provides a well-designed and ergonomic administration console through which the system administrator is able to define, create and deploy any infrastructure, as complex as it might be. However, using a console, be it user-friendly, is very repetitive and error prone, as all the operations are done manually. One alternative to manually configure through the console its infrastructure is the use of templates. These are models of well-known common infrastructures that the system administrators can set-up themselves or get them freely from different open source web sites. However, they have to manually adapt the templates to their specific use case and, since adaptation process is manually, it is almost as repetitive and error prone as the classical method consisting in defining and creating the infrastructure from scratch. Enter the scripting technology.
Fortunately, the AWS infrastructure may be scripted. This means writing code which defines, creates and deploys in the cloud the required elements of infrastructure. There are currently several notations allowing to write such code. One of them is, as mentioned above, the Amazon dedicated tool named CloudFormation. This was the first tool available for AWS and it has the advantage of natively supporting 100% of the AWS infrastructure. However, it doesn’t provide the much thought-after “cloud agnostic” capability which allows to deploy the same infrastructure on a different cloud. For example, should you want to go to Azure, the CloudFormation scripts you’ve written during the last year don’t work anymore and you have to start from the beginning.
As opposed to CloudFormation, Terraform from Hashicorp integrates the concept of “cloud provider”. According to this concept, the tool supports a certain number of providers, one for AWS, another one for Azure or for GC, etc., and should you need next week to completely migrate from AWS to another cloud, the Terrform scripts you already have may be highly re-used. But we need to add a word of caution concerning this supposed transparent portability between clouds. As a matter of fact, migrating to another cloud doesn’t only require to replace the cloud provider in a Terraform script. The reality is that different clouds don’t support exactly the same infrastructure. For example, servers, databases, load balancers and so on are very different in AWS compared to the ones supported in Azure or GC in terms of features, configurations, management, security, scalability, availability, etc. Consequently, while Terraform provides cloud providers for each known cloud, migrating between clouds requires much more effort than only changing the cloud provider in a Terraform script. Accordingly, the cloud agnosticness provided by Terraform shall be seen as its capacity to use the same language, notation, toolsets and IAC practices under the hood. But it’s important to understand that, despite this cloud agnosticness, Terraform scripts hacve to be rewritten in order to migrate to another cloud, even if this rewriting process is much less complex that it would have been while using different tools.
The File Layout
The following figure shows our project file layout.
├───dev
│ ├───data-stores
│ │ │ terraform.tfstate
│ │ │
│ │ └───mysql
│ │ main.tf
│ │ outputs.tf
│ │ README.md
│ │ terraform.tfstate
│ │ terraform.tfstate.backup
│ │ vars.tf
│ │
│ └───services
│ └───webserver-cluster
│ main.tf
│ outputs.tf
│ README.md
│ terraform.tfstate
│ terraform.tfstate.backup
│
├───global
│ └───s3
│ main.tf
│ outputs.tf
│ README.md
│ terraform.tfstate
│ terraform.tfstate.backup
│ vars.tf
│
└───modules
└───services
└───webserver-cluster
httpd.sh
main.tf
outputs.tf
README.md
vars.tf
This is supposed to be a multi-environment file layout. The “dev” folder, for example, contains the scripts required for the development configuration while the “global” one contains scripts required for all the environments. In our example, we have only one environment, the “dev” one. This is for simplicity sake and, in a real case, there should be other environments like “prod”, “stage”, “test”, etc. The other two folders are global, which defines the common stuff for all the environments, and modules, which allows to remove duplications of code by defining reusable modules. Let’s look in more details at each of these folders.
Terraform code is written in in the Hashicorp Configuration Language (HCL) in files with extension .tf. This is a declarative language wich describes the infrastructure we want that Terraform creates for us. This article is not a Terraform or HCL tutorial and, as such, it won’t give extensive explanations concerning the language syntax or semantic. The full documentation may be found on the Terraform web site.
The global folder
This folder hosts scripts which are common to all the environments. We only have one environment in our sample, however, in a real case with several environments, putting the common staff in a centralized place will help to better structure our code. Here is the content of the main file, named main.tf.
terraform {
required_version = ">= 0.11, < 0.12"
}
provider "aws" {
region = "us-east-1"
}
resource "aws_s3_bucket" "simplex_software" {
bucket = "${var.bucket_name}"
versioning {
enabled = true
}
}
This script requires Terraform version 0.11.* and uses the AWS cloud provider in order to create the subsequent infrastructure in the us-east-1b region. For more information concerning the AWS regions please see https://docs.aws.amazon.com/fr_fr/general/latest/gr/rande.html.
If you read this blog post you probably know that Terraform keeps its infrastructure status in plain files having a .tfstate extension. In the directory tree above, the files terraform.tfstate and terraform.tfstate.backup serve this purpose. This is perfectly fine for small individual projects but, as soon as you’re a team working on a real project, you will experience some issues if several members of the team need to access these files. The solution consists in sharing these files between the team members and, while this could perfectly be done using version control systems, like your GIT repository, a better solution exists: the Terraform support for the remote state storage. Using this feature, one could configure Terraform to store and fetch data to and from a remote store, every time it runs. Several types of remote store are supported, like Amazon S3, Azure Storage, HashiCorp Consul, etc. In this sample we are using Amazon S3.
Hence, in order to enable state storage with S3, we are creating an S3 bucket, having the ID of simplex_software. This is done by the resource statement above, to which we pass the resource type of aws_s3_bucket. If you’re reading this blog post then you probably know that each Terraform resource has a predefined type associated to it. In our case we want to create an S3 bucket and, hence, the resource type is aws_s3_bucket (for more information about S3 buckets please see https://docs.aws.amazon.com/fr_fr/AmazonS3/latest/dev/UsingBucket.html.
An S3 bucket has a name. Since we don’t want that our S3 bucket name be hard-coded, we use a property defined in the var.tf file to define this name. Here is the content of this file.
variable "bucket_name" {
description = "The name of the S3 bucket. Must be globally unique."
}
As you probably already know, each Terraform property must be defined in a HCL file which name by default is vars.tf. This definition may have an optional description and an optional default value. In our case, we don’t provide a default value for our S3 bucket name, which means that it will be provided by the system administrator, who will type it in while running the script.
Last but not least, our S3 bucket has an Amazon Resource Name (ARN) which is to be used by all the infrastructure elements which statuses need to be shared. While this ARN is generated, the other infrastructure elements that need it cannot refer it. In order to solve such cases, Terraform provide output variables, as shown in the following outputs.tf file:
output "s3_bucket_arn" {
value = "${aws_s3_bucket.simplex_software.arn}"
}
What the code above is doing is that it provides the ARN of the S3 bucket which ID is simplex_software. This way, instead of directly refer to this ARN, which wouldn’t be possible because it is generated, the infrastructure elements that need it will reference it through this output variable, as will be shown later.
The dev folder
This folder hosts the scripts which are required for the development environment. They are structured in two categories: data-stores and services. The first folder, data-stores, hosts the scripts defining the MySQL database on the Amazon Relational Database Services (RDS).
The file data-stores/mysql/main.tf contains the main configuration, as follows:
terraform {
required_version = ">= 0.11, < 0.12"
backend "s3" {
bucket = "simplex-software-s3-bucket"
region = "us-east-1"
key = "dev/data-stores/mysql/terraform.tfstate"
encrypt = true
}
}
provider "aws" {
region = "us-east-1"
}
resource "aws_db_instance" "simplex_software" {
name = "simplex_software_mysql_dev_instance"
engine = "mysql"
allocated_storage = 10
instance_class = "db.t2.micro"
username = "root"
password = "${var.db_password}"
skip_final_snapshot = true
}
To quickly resume, here is what the code above is telling:
- The version of Terraform that should be used to execute this script is the 0.11.*
- The AWS S3 bucket, having the ID of simplex-software-s3-bucket, created by the script in the global directory, will be used for status sharing and isolation purposes
- The AWS cloud provider is going to be used and the described infrastructure will be deployed into the us-east-1b
- The resource defined above is of an aws_db_instance Any Terraform resource has a predefined type associated to it. The aws_db_instance type refers to a database deployed in RDS. In our case, this is a MySQL database with 10 GB of allocated storage and an instance-class of t2.micro. For a complete explanantion of the AWS instances please see https://aws.amazon.com/fr/ec2/instance-types/. The parameter skip_final_snapshot specifies that a snapshot won’t be required before deleting the database instance. In order to access to this database, username/password credentials type shall be used. The user name is root, as per the password, it is not defined here for security reasons, but it will rather typed in by the system administrator when the script will be executed by Terraform.
As you can notice, the password is defined through a property declared in the vars.tf file, as follows:
variable "db_password" {
description = "The password for the database"
}
There is no default value for the database password which means that it shall be typed in by the administrator while running the script. Last but not least, the outputs.tf file provides the database host name and its TCP port number to be used by any other components:
output "address" {
value = "${aws_db_instance.simplex_software.address}"
}
output "port" {
value = "${aws_db_instance.simplex_software.port}"
}
Now, let’s have a look at the webserver-cluster directory which contains all the required stuff for defining and creating the ASG with its ELB and its two EC2 instances hosting web servers.
terraform {
required_version = ">= 0.11, < 0.12"
}
provider "aws" {
region = "us-east-1"
}
module "webserver_cluster" {
source = "../../../modules/services/webserver-cluster/"
web_server_cluster_name = "webserver-cluster-dev"
s3_bucket_name_for_db_state = "simplex-software-s3-bucket"
s3_path_for_db_state = "dev/data-stores/mysql/terraform.tfstate"
ec2_instance_type = "t2.micro"
ami_image_id = "ami-40d28157"
ec2_instance_min_size = 2
ec2_instance_max_size = 2
environment_name = "dev"
}
The main.tf file above it’s very simple: it delegates the operation to a separate module, located in the ../modules directory. This is the Terraform standard way to provide modularity by defining a generic processing model in modules, and by specializing this generic processing model using properties. All the other statements in the listing above are property initializations statement. These properties are defined in the ../modules/services/webserver-cluster/vars.tf, as shown below:
variable "web_server_port" {
description = "The TCP port the server will use for HTTP requests"
default = 8080
}
variable "web_server_cluster_name" {
description = "The name to use for all the cluster resources"
}
variable "s3_bucket_name_for_db_state" {
description = "The name of the S3 bucket for the database's remote state"
}
variable "s3_path_for_db_state" {
description = "The path for the database's remote state in S3"
}
variable "ec2_instance_type" {
description = "The type of EC2 Instances to run (e.g. t2.micro)"
}
variable "ami_image_id" {
description = "The ID of the AMI"
}
variable "ec2_instance_min_size" {
description = "The minimum number of EC2 Instances in the ASG"
}
variable "ec2_instance_max_size" {
description = "The maximum number of EC2 Instances in the ASG"
}
variable "environment_name" {
description = "The name of the environment (e.g. dev or test)"
}
Now let’s have a look at the module file defined in the ../modules/services/webserver-cluster/main.tf:
terraform {
required_version = ">= 0.11, < 0.12"
}
resource "aws_launch_configuration" "simplex_software" {
name = "simplex-software-aws-launch-config"
image_id = "${var.ami_image_id}"
instance_type = "${var.ec2_instance_type}"
security_groups = ["${aws_security_group.simplex_software.name}"]
user_data = "${data.template_file.httpd_data.rendered}"
lifecycle {
create_before_destroy = true
}
}
data "template_file" "httpd_data" {
template = "${file("${path.module}/httpd.sh")}"
vars {
httpd_server_port = "${var.web_server_port}"
db_host_name = "${data.terraform_remote_state.db.address}"
db_port_number = "${data.terraform_remote_state.db.port}"
}
}
resource "aws_autoscaling_group" "simplex_software" {
name = "simplex-software-aws-autoscaling-group"
launch_configuration = "${aws_launch_configuration.simplex_software.id}"
availability_zones = ["${data.aws_availability_zones.all.names}"]
load_balancers = ["${aws_elb.simplex_software.name}"]
health_check_type = "ELB"
min_size = "${var.ec2_instance_min_size}"
max_size = "${var.ec2_instance_max_size}"
tag {
key = "Name"
value = "${var.web_server_cluster_name}"
propagate_at_launch = true
}
}
resource "aws_security_group" "simplex_software" {
name = "${var.web_server_cluster_name}-security-group"
lifecycle {
create_before_destroy = true
}
}
resource "aws_security_group_rule" "simplex_software_inbound" {
type = "ingress"
security_group_id = "${aws_security_group.simplex_software.id}"
from_port = "${var.web_server_port}"
to_port = "${var.web_server_port}"
protocol = "tcp"
cidr_blocks = ["0.0.0.0/0"]
}
data "aws_availability_zones" "all" {}
resource "aws_elb" "simplex_software" {
name = "${var.web_server_cluster_name}-elb"
availability_zones = ["${data.aws_availability_zones.all.names}"]
security_groups = ["${aws_security_group.simplex_software_elb.id}"]
listener {
lb_port = 80
lb_protocol = "http"
instance_port = "${var.web_server_port}"
instance_protocol = "http"
}
health_check {
healthy_threshold = 2
unhealthy_threshold = 2
timeout = 3
interval = 30
target = "HTTP:${var.web_server_port}/"
}
}
resource "aws_security_group" "simplex_software_elb" {
name = "${var.web_server_cluster_name}-security-group-elb"
}
resource "aws_security_group_rule" "simplex_software_elb_inbound" {
type = "ingress"
security_group_id = "${aws_security_group.simplex_software_elb.id}"
from_port = 80
to_port = 80
protocol = "tcp"
cidr_blocks = ["0.0.0.0/0"]
}
resource "aws_security_group_rule" "simplex_software_outbound" {
type = "egress"
security_group_id = "${aws_security_group.simplex_software_elb.id}"
from_port = 0
to_port = 0
protocol = "-1"
cidr_blocks = ["0.0.0.0/0"]
}
data "terraform_remote_state" "db" {
backend = "s3"
config {
bucket = "${var.s3_bucket_name_for_db_state}"
key = "${var.s3_path_for_db_state}"
region = "us-east-1"
}
}
resource "aws_autoscaling_schedule" "scale_out_during_business_hours" {
scheduled_action_name = "scale-out-during-business-hours"
min_size = 2
max_size = 2
desired_capacity = 2
recurrence = "0 9 * * *"
autoscaling_group_name = "${aws_autoscaling_group.simplex_software.name}"
}
resource "aws_autoscaling_schedule" "scale_in_at_night" {
scheduled_action_name = "scale-in-at-night"
min_size = 1
max_size = 2
desired_capacity = 1
recurrence = "0 17 * * *"
autoscaling_group_name = "${aws_autoscaling_group.simplex_software.name}"
}
This module defines the following Terraform resources that we will examine in details.
The Launch Configuration
This is a Terraform resource of the type aws_launch_configuration, with the following properties:
- name: this name uniquely identify the current launch configuration
- image_id: this parameter identifies the Ami which will be used and it is defined through properties
- instance_type: this is the EC2 instance type to be used and it is defines through properties as being micro
- security_groups: this is the list of the security groups associated to the launch configuration. In our case we only have a security group, defined below
- user_data: this is a way to pass arbitrary data to the launch configuration. In our case, we are passing some information rendered from a template file defined below. These information will include the MySQL host name and TCP port number.
- lifecycle: the create_before_destroy value here means that should the database needs to be recreated, a backup copy will be done before.
The Template File
This is a Terraform resource of the type template_file type. It defines the file httpd.sh as a template. A template is a file containing placeholders which will be replaced with actual values. In our case, the placeholders named httpd_server_port, db_host_name and, respectively, db_port_number, will be replaced with the current values representing the our web servers TCP port number and the MySQL database host name and port number.
The Autoscaling Group
This is a Terraform resource of the type of aws_autoscaling_group with the following properties:
- name: this name uniquely identify the current ASG
- launch_configuration: this is the name of the lauching configuration, defined above, to which this ASG belongs
- availability_zones: this is the list of the AWS zones in which the current ASG will be available
- load_balancers: this is the list of the load balancers used for the current ASG. Here we have one load balancer and it is defined below
- min_size: this is the minimum number of the EC2 instances supported by the ASG
- max_size: this is the maximum number of the EC2 instances supported by the ASG
The Security Group
This is a Terraform resource of the type aws_security_group having a name based on the webserver_cluster_name property. This security group has two security rules assigned to it, as follows:
- an inbound security rule opening the web servers TCP port number for any existent IP address
- an outbound security rule disallowing outputs for any protocol, any IP address and any TCP port
Another similar security group is defined for the ELB.
The Elastic Load Balancer
This is a Terraform resource of type aws_elb with the following properties:
- name: this name uniquely identify the current ELB
- availability_zones: this is the list of the AWS zones in which the current ELB will be available
- security_groups: this is the list of the security groups associated to the ELB
- listener: a HTTP listener is defined on the TCP port number 80
- healthy_check: declares the healthy status (two EC2 instances active) and the unhealthy one (no EC2 instance active)
The Remote Status
This is a Terraform resource of the type terraform_remote_state which is meant to store the current status of the database. The remote state is based on a S3 bucket defined by a name and a path, both being initialized through properties.
The Autoscaling Schedule
Two Terraform autoscaling policies are configured, as follows:
- a business hours policy consisting in 2 desired EC2 active instances
- a nightly hours policy consisting in 1 desired EC2 active instance
Running the Terraform scripts
In order to create the infrastructure presented in this blog post, all you need to do is to cd in the project’s root directory and to execute the setup.sh shell script. This script will execute terraform init, plan and apply commands for every layer like global, data-store and webserver-cluster. It might take a while to execute, for example, on my laptopn it usually takes more than 4 minutes. When it finishes, your infrastructure is ready and, if you fire your preferred browser to the ASG URL, you’ll get the response here below. This URL is displayed on the standard output, as the last line of the execution listing, for example:
elb_dns_name = webserver-cluster-dev-elb-1639163829.us-east-1.elb.amazonaws.com

Congratulations, you AWS infrastructure works and, after having finishing playing with it, don’t forget to run the destroy.sh script, which will clean-up everything such that to avoid you to be invoiced by Amazon. You may find the project's code here: https://github.com/nicolasduminil/devops.git. Enjoy !