The on-demand disk storage is an infrastructure pattern which consists in resizing a running instance's volumes, when they get to their maximum capacity or when the applications become very I/O heavy. While this is a manual process which requires some down time, in this tutorial we'll be using an IAC approach based onTerraform scripts, in order to create our initial infrastructure.
The scenario is quite classical: in the beggining, once you've created your EC2 instance and installed on it the required applications, every thing is fine. But over the time, with more and more users and increased usage, you need more space on the disk volumes. Also, the I/O operations take more and more. If you are in the described situation then keep reading as this tutorial is for you.
So let's consider the EC2 instance defined by the script below:
terraform {
required_version = ">= 0.11, < 0.12"
}
provider "aws" {
region = "us-east-1"
version = "~> 1.53"
}
resource "aws_instance" "simplex_software" {
ami = "ami-40d28157"
instance_type = "t2.micro"
security_groups = [
"${aws_security_group.simplex_software_default.name}",
"${aws_security_group.simplex_software_nat.name}"]
key_name = "simplex-software"
tags {
Name = "Simplex Software"
}
}
resource "aws_key_pair" "terraform_ec2_key" {
key_name = "simplex-software"
public_key = "${file("/home/nicolas/.ssh/id_rsa.pub")}"
}
resource "aws_security_group" "simplex_software_default" {
name = "simplex-software-default"
description = "Default security group that allows inbound and outbound traffic from all
instances in the VPC"
ingress {
from_port = "0"
to_port = "0"
protocol = "-1"
cidr_blocks = ["0.0.0.0/0"]
self = true
}
egress {
from_port = "0"
to_port = "0"
protocol = "-1"
cidr_blocks = ["0.0.0.0/0"]
self = true
}
tags {
Name = "simplex-software-default"
}
}
resource "aws_security_group" "simplex_software_nat" {
name = "simplex-software-nat"
description = "Security group for nat instances that allows SSH and VPN traffic from internet"
ingress {
from_port = 22
to_port = 22
protocol = "tcp"
cidr_blocks = ["0.0.0.0/0"]
}
ingress {
from_port = 1194
to_port = 1194
protocol = "udp"
cidr_blocks = ["0.0.0.0/0"]
}
tags {
Name = "simplex-software-nat"
}
}
resource "aws_ebs_volume" "simplex_software_ebs_20" {
availability_zone = "us-east-1c"
size = 20
type = "gp2"
tags = {
Name = "ebs-20"
}
}
resource "aws_volume_attachment" "simplex_software_att" {
device_name = "/dev/sdf"
volume_id = "${aws_ebs_volume.simplex_software_ebs_20.id}"
instance_id = "${aws_instance.simplex_software.id}"
}
This script will create an EC2 instance of type t2.micro, running an Ubuntu based AMI, in the US-EAST-1 region. It has two security groups attached to it, opening the TCP port number 22, for SSH, and UDP port number 1194, for communications inside the default VPC (Virtual Provate Cloud). All the other ports for TCP and UDP protocols are closed and no other protocol then TCP and UDP are supported.
A 20 GB volume of the standard magnetic type is also attached to this instance. Running this script will produce the following output:
nicolas@BEL20:~/devops/tf$ terraform plan
Refreshing Terraform state in-memory prior to plan...
The refreshed state will be used to calculate this plan, but will not be
persisted to local or remote state storage.
aws_instance.example: Refreshing state... (ID: i-0f6fc6792bfef344e)
aws_key_pair.terraform_ec2_key: Refreshing state... (ID: codecommit_rsa)
------------------------------------------------------------------------
An execution plan has been generated and is shown below.
Resource actions are indicated with the following symbols:
+ create
Terraform will perform the following actions:
+ aws_instance.simplex_software
id: <computed>
...
+ aws_key_pair.terraform_ec2_key
...
Plan: 2 to add, 0 to change, 0 to destroy.
------------------------------------------------------------------------
Do you want to perform these actions?
Terraform will perform the actions described above.
Only 'yes' will be accepted to approve.
Enter a value: yes
aws_key_pair.terraform_ec2_key: Creating...
fingerprint: "" => "<computed>"
key_name: "" => "simplex-software"
public_key: "" => "ssh-rsa
...
Apply complete! Resources: 2 added, 0 changed, 0 destroyed.
nicolas@BEL20:~/devops/tf$
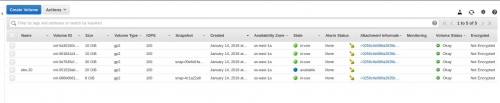
Now your instance is up and running and, connecting to the AWS administration console, you can check your 20 GB disk volume, as shown below:

Here you can see two volumes: one having 8GB created by default by the selected AMI and the 2nd one having 20GB, explictly created by the script. In order to use this volume, we need to mount and format it such that to create a file system structure on it. In order to do that, you need to ssh to your instance and to perform the following commands:
ubuntu@ip-172-31-84-144:~$ lsblk
NAME MAJ:MIN RM SIZE RO TYPE MOUNTPOINT
xvda 202:0 0 8G 0 disk
└─xvda1 202:1 0 8G 0 part /
xvdf 202:80 0 20G 0 disk
Here, by displaying all our block devices (volumes) we see that your 20GB volume is xvdf. Let's format it:
ubuntu@ip-172-31-84-144:~$ sudo mkfs -t ext4 /dev/xvdf
mke2fs 1.42.13 (17-May-2015)
Creating filesystem with 5242880 4k blocks and 1310720 inodes
Filesystem UUID: 077b08ae-e7ed-4dfa-9d9c-74f9368892cf
Superblock backups stored on blocks:
32768, 98304, 163840, 229376, 294912, 819200, 884736, 1605632, 2654208,
4096000
Allocating group tables: done
Writing inode tables: done
Creating journal (32768 blocks): done
Writing superblocks and filesystem accounting information: done
Now, let's mount the volume and create some directory structure on it, in order to store data:
ubuntu@ip-172-31-43-219:~$ sudo mount /dev/xvdf /opt/data
ubuntu@ip-172-31-43-219:~$ time dd if=/dev/zero of=/opt/data/test bs=512k count=200
dd: failed to open '/opt/data/test': Permission denied
real 0m0.004s
user 0m0.000s
sys 0m0.000s
ubuntu@ip-172-31-43-219:~$ sudo time dd if=/dev/zero of=/opt/data/test bs=512k count=200
200+0 records in
200+0 records out
104857600 bytes (105 MB, 100 MiB) copied, 0.0564756 s, 1.9 GB/s
0.00user 0.04system 0:00.05elapsed 91%CPU (0avgtext+0avgdata 2524maxresident)k
8inputs+204800outputs (0major+211minor)pagefaults 0swaps
ubuntu@ip-172-31-43-219:~$
The stats here above show that our volume is able to write data at a rate of 1.9 GB/s. However, the rewrite rate is lower, as shown below:
ubuntu@ip-172-31-43-219:~$ sudo time dd if=/dev/zero of=/opt/data/test bs=512k count=200
200+0 records in
200+0 records out
104857600 bytes (105 MB, 100 MiB) copied, 0.621292 s, 169 MB/s
0.00user 0.07system 0:00.63elapsed 11%CPU (0avgtext+0avgdata 2580maxresident)k
0inputs+204800outputs (0major+212minor)pagefaults 0swaps
ubuntu@ip-172-31-43-219:~$
As a matter of fact, rewriting data is much slower then writing them for the first time: 1.9 GB/S, vs. 169 MB/s. Now, let's resize the volume at 100GB. In order to do that, we need to unmount it first, make a snapshot for it, detach it from the current instance and, from the snapshot, make another volume of 30 GB. Once created, the new volume needs to be attached to our running instance. All these operations, beyond the unmount one, are to be performed via the AWS admin console, using its graphical interface and, as such, they don't require any additional explanations. The final result is shown below:

Here we have an additional 30 GB volume attached to our EC2 instance. Back to our ssh session, we need to extend the file system we created previously such that to expand to the new volume size:
ubuntu@ip-172-31-84-144:~$ e2fsck -f /dev/xvdf
e2fsck 1.42.13 (17-May-2015)
e2fsck: Permission denied while trying to open /dev/xvdf
You must have r/w access to the filesystem or be root
ubuntu@ip-172-31-84-144:~$ sudo e2fsck -f /dev/xvdf
e2fsck 1.42.13 (17-May-2015)
Pass 1: Checking inodes, blocks, and sizes
Pass 2: Checking directory structure
Pass 3: Checking directory connectivity
Pass 4: Checking reference counts
Pass 5: Checking group summary information
/dev/xvdf: 11/1310720 files (0.0% non-contiguous), 126289/5242880 blocks
ubuntu@ip-172-31-84-144:~$ sudo resize2fs /dev/xvdf
resize2fs 1.42.13 (17-May-2015)
Resizing the filesystem on /dev/xvdf to 7864320 (4k) blocks.
The filesystem on /dev/xvdf is now 7864320 (4k) blocks long.
Now, we resized our volume from 20 GB to 30 GB with a minimum of downtime and, given that all the commands we executed in our ssh session may be scripted, with a maximum of the automation as well.
ubuntu@ip-172-31-43-219:~$ df -h
Filesystem Size Used Avail Use% Mounted on
udev 490M 0 490M 0% /dev
tmpfs 100M 4.3M 95M 5% /run
/dev/xvda1 7.8G 912M 6.5G 13% /
tmpfs 496M 0 496M 0% /dev/shm
tmpfs 5.0M 0 5.0M 0% /run/lock
tmpfs 496M 0 496M 0% /sys/fs/cgroup
tmpfs 100M 0 100M 0% /run/user/1000
/dev/xvdf 30G 144M 28G 1% /opt/data
ubuntu@ip-172-31-43-219:~$
As seen in the statistics above, the throughtput of our volume is of 1.9 GB/s for creation and about 170 MG/s for rewriting. Now we will increase this throughput by replacing our 20 GB volume by a software defined RAID0 drive. And since we cannot create this new drive from the snapshot taken previously because it was done against a non RAID ext4 file system, we need to add two new volumes of 10GB each, configure them as a RAID0 array and the move the data to it.
Here is the block devices listing once that these two new volumes have been created and attached to the EC2 instance:
ubuntu@ip-172-31-43-219:~$ lsblk
NAME MAJ:MIN RM SIZE RO TYPE MOUNTPOINT
xvda 202:0 0 8G 0 disk
└─xvda1 202:1 0 8G 0 part /
xvdf 202:80 0 30G 0 disk /opt/data
xvdg 202:96 0 10G 0 disk
xvdh 202:112 0 10G 0 disk
ubuntu@ip-172-31-43-219:~$
As shown above, the new volumes are xvdf and xvdg with 10GB each. Now we can format these volumes un set them up in a software RAID0 configuration, as follows:
ubuntu@ip-172-31-84-144:~$ sudo mdadm --create --verbose /dev/md0 --level=stripe --raid-device=2 /dev/xvdf /dev/xvdg
mdadm: chunk size defaults to 512K
mdadm: Defaulting to version 1.2 metadata
mdadm: array /dev/md0 started.
ubuntu@ip-172-31-84-144:~$ sudo mkfs.ext4 /dev/md0
mke2fs 1.42.13 (17-May-2015)
Creating filesystem with 5238784 4k blocks and 1310720 inodes
Filesystem UUID: fbf6296e-29f6-46c4-bed5-0d08c4930698
Superblock backups stored on blocks:
32768, 98304, 163840, 229376, 294912, 819200, 884736, 1605632, 2654208,
4096000
Allocating group tables: done
Writing inode tables: done
Creating journal (32768 blocks): done
Writing superblocks and filesystem accounting information: done
Now, let's mount the RAID0 drive:
ubuntu@ip-172-31-43-219:~$ sudo mkdir /opt/data2
ubuntu@ip-172-31-43-219:~$ sudo mount /dev/md0 /opt/data2
ubuntu@ip-172-31-43-219:~$
And finally, let's copy our data and check again the volume's throughput:
ubuntu@ip-172-31-43-219:~$ sudo cp /opt/data/test /opt/data2/test
ubuntu@ip-172-31-43-219:~$ sudo time dd if=/dev/zero of=/opt/data2/test bs=512 count=200
200+0 records in
200+0 records out
102400 bytes (102 kB, 100 KiB) copied, 0.000441016 s, 232 MB/s
0.00user 0.00system 0:00.00elapsed ?%CPU (0avgtext+0avgdata 2016maxresident)k
0inputs+200outputs (0major+82minor)pagefaults 0swaps
Here we have increased our throughput, for the rewrite operation,from 169MB/s to 232 MB/s.
This concludes our exercice. Congratulations if you followed up, you succeeded to extend the size of your EBS drive as well as dramatically increasing its throughput. Don't forget to clean-up things when finishing by manually deleting from the AWS console your new created volumes and by finally running the terraform destroy command.