This blog entry is analyzing the Docker native clustering option, with the brand new Swarm mode which is now a part of Docker Engine 1.12. Do we still have any reason to use Kubernetes clusters ? That's what we're trying to discuss here.
Kubernetes, Kubernetes, Kubernetes ! If you didn't spend the last couple of years on the planet Mars, you couldn't not have heard about it. There are dozens of books teaching how to deploy and use it and, every week, new articles or blog tickets on Dzone, stackoverflow or LinkedIn, shows you new tips, tricks and hacks. At such a point that most of the micro-services architects and devops engineers think that Kubernetes is currently the only viable clustering solution.The true is that Kubernetes does a great job since several years. As soon as the Linux containers technology became ubiquitous with the raise of Docker platforms, the number of the deployable micro-services and other software components has grown dramatically and it was more and more difficult to manage them all. Google was probably the first company that realized the need of a much better way of deploying and managing the software components and their associated infrastructure, such that to scale globally.
Enter Kubernetes: a software system that allows to easily deploy and manage containerized services on top of it. And since these containerized services are generally Docker based, Kubernetes became kind of Docker machine, in spite of its support for other container technologies then Docker, for example rkt (pronounced rock-it), or OCI (Open Container Initiative). This was in order to counteract the Docker lack of clustering features. As a matter of fact, before its 1.12 release in July 2016, Docker used to propose a quite limited clustering solution, called Swarm. This solution, called the old Swarm was a separate product, that had to be installed on the top of the Docker platform and that required not only to install and configure agents on all of the cluster nodes, but that also relied on several externals services like Consul, etcd or Zookeeper. The old Swarm was, in a way, an orchestrator for Docker, similar to Kubernetes but more limited and less likely to provide the same functionalities.
However, the situation had recently changed, with the arrival of what is called now the new Swarm. All the tools and components required to manage clusters are now incorporated into Docker Engine. Swarm is there, service discovery is there, improved networking is there, everyting that one needs to do in order to get micros-services based clusters is there. you only have to install Docker, period. Why then to bother embarking in a complex procerss of installation and configuration of Kubernetes when Docker, which is anyway required in order to get Kubernetes running, already provides every thing one needs ?
Setting up a full-fledged, multi-node Kubernetes cluster isn’t a simple task, especially for someone who's not well-versed in Linux and networking administration. A proper Kubernetes install spans multiple physical or virtual machines and requires the networking to be set up properly, so that all the containers running inside the Kubernetes cluster can connect to each other through the same flat networking space. A long list of methods exists for installing a Kubernetes cluster. These methods are
described in detail in the documentation at http://kubernetes.io. They are quite complex as anyone having tried to follow these instructions have noticed and the fact that they are changing so often doesn't help much.
So, is the new Swarm better then Kubernetes ? I would incline to say yes, but you don't have to take my word for it. Let's look at a use case to see if I'm able to convince you. Let's consider a micro-service cluster running the following:
- Two instances of nginx web server
- One instance of the Tomcat application server
- One instance of the MySQL database
Of course, different micro-services are running in the Tomcat application server as well as in the nginx web server.
In order to setup this Swarm cluster, we need first to craete several virtual machines. For example, considering that we have a bash script that creates a cluster which number of nodes is passed as an input argument, this could be done as follows:
#

# Create the VMs

#

for node in $(seq $number)

do

  docker-machine create -d virtualbox --virtualbox-memory=2048 $name-$node > /dev/null

done
Here we're using the
docker-machine command to create number VirtualBox machines having each one 2GB of RAM. We assume that the variable name contains the name that will be assigned to our new cluster, hence each cluster node will have a node of the form name-1, name-2 ... name-number. Now, once that our virtual machines have been created, we can create our cluster. And as each cluster has leaders and Swarm is not any different, we also need to declare the cluster's leaders. Assuming that the variable
leaders is an input argument containing the number of the cluster leaders, the following sequence will initialize the cluster and create the required number of leaders.#
# Set the cluster leaders as being the first $leaders nodes
#
for node in $(seq $leaders)
do
eval $(docker-machine env $name-$node)
ip-addr=$(docker-machine ip $name-$node)
docker swarm init --advertise-addr $ip-addr >/dev/null
doneHere the
eval $(docker-machine env $name-$node) statement allows to open a tunel to the virtual machine which name is name-node. This way, all the subsequent docker commands will be forwarded to this virtual machine instead of the host. Then the docker swarm init command creates the cluster with the required number of nodes and publicly publishes their IP address.As we have seen, there are two categories of cluster nodes: leaders and workers. Now that our cluster has been initialized and we created its leaders, we need to configure its workers.
#

# Get the worker token

#

TOKEN=$(docker swarm join-token -q worker)


#

# Set the workers nodes

#

for node in $(seq $(($leaders+1)) $number)

do

  eval $(docker-machine env $name-$node)

  docker swarm join --token $TOKEN --advertise-addr $(docker-machine ip $name-$node) $(docker-machine ip $name-1):$port > /dev/null

done
To create the cluster workers we need to use the
docker swarm join command. This command takes as arguments, besides the IP address of the worker, a so-called worker token. This worker token may be obtain using docker swarm join-token -q worker command, as shown in the code above.Now our cluster is up and running and its nodes have been configured as leaders and workers. We can check that using the
docker node ls command on a leader node, i.e. after executing eval $(docker-machine env $name-1) where name-1 is the name of the first leader node. Here is the result:
We came to the point where we have to deploy our services on the new created cluster. Docker Swarm introduces a very handy notion, the one of stack. A stack is a slightly modified version of the
docker-compose artefact which defines a certain number of services a an YAML template file. In our case, this template file looks as follows:version: "3"
services:
nginx:
image: nginx:latest
ports:
- 80:80
- 443:443
networks:
- ${network}
deploy:
replicas: 2
tomcat:
image: tomcat:8.0-jre8
ports:
- "8080:8080"
networks:
- ${network}
deploy:
replicas: 1
mysql:
image: mysql:5.7
environment:
MYSQL_DATABASE: 'db'
MYSQL_USER: 'user'
MYSQL_PASSWORD: 'password'
MYSQL_ROOT_PASSWORD: 'password'
ports:
- '3306:3306'
networks:
- ${network}
deploy:
replicas: 1
networks:
${network}:
external: trueAs you can see, the file above has a syntax which is very similar to the
docker-compose one. It defines three services, an nginx web server with two instances, an Apache Tomcat application server having one instance and a MySQL data base service with one instance as well. Docker Swarm will pick up the most appropriated nodes and will distribute on them these instances. And if one node suddenly becomes out of order, Docker swarm will automatically create a new one and will migrate on it the failing service. The file above is not yet the stack YAML but only a template. As a template, it contains placeholders, for example ${network}. This placeholder has to be replaced with the network real name. The following code does that:
#

# Create an overlay network adapter

#

docker network create --driver overlay $network


#

#  Create the stack file create-stack.yml out of a file template

#

export network

( echo "cat <create-stack.yml";

cat create-stack-template.yml;

echo "";

echo "EOF";

) >temp.yml

. temp.yml
In the code above, we create an overlay network which name is passed as an input argument. Then we export that variables such that to be available to su-shells. Finally, we create a sub-shell in which we create a temporary file called
temp.yml. This temporary file will contained the required statememnt to create the actual YAML file, named create_stack.yml by simply copying the file create-stack-template.yml and replacing in it the placeholder ${network} with the content of the exported variable network. Once the temporary file created, we source it and this will have the result of creating the file creatre-stack.yml. here is this file:version: "3"
services:
nginx:
image: nginx:latest
ports:
- 80:80
- 443:443
#volumes:
#- /opt/nginx:/etc/nginx
#- /opt/nginx/conf.d:/etc/nginx/conf.d
#- /opt/www:/opt/www
networks:
- sw-network
deploy:
replicas: 2
tomcat:
image: tomcat:8.0-jre8
ports:
- "8080:8080"
#volumes:
#- ./logs/:/usr/local/tomcat/logs/
networks:
- sw-network
deploy:
replicas: 1
mysql:
image: mysql:5.7
environment:
MYSQL_DATABASE: 'db'
MYSQL_USER: 'user'
MYSQL_PASSWORD: 'password'
MYSQL_ROOT_PASSWORD: 'password'
ports:
- '3306:3306'
networks:
- sw-network
deploy:
replicas: 1
networks:
sw-network:
external: trueAs you can see, this file is exactly the
create-stack-template.yml in which we replaced the placeholders by the actual values. Now we can create our stack, as follows:#
# Create a stack having nginx, tomcat and mysql
#
docker stack deploy -c create-stack.yml $stack > /dev/nullThat's all. Our stack with the 4 services is created and we can verify it:
docker service ls | tail -n+2 | awk '{ print $2 }' | xargs docker service psHere is the result:

The fact that Docker 1.12 contains every thing one needs in order to manage clusters doesn't mean that we cannot use other complementary tools. One of them is Portainer. This is a centralized web-app that gives to the cluster administrator a very consistent vision of the nodes, services and stacks. Portainer can be ran as a Docker Swarm service, as follows:
#

# Create a service running portainer

#

docker service create --name portainer --publish 9000:9000 --replicas=1

--mount type=bind,source=/var/run,destination=/var/run

--mount type=bind,source=/var/run/docker.sock,destination=/var/run/docker.sock

--constraint 'node.role == manager' portainer/portainer > /dev/null
Here we create a Docker Swarm single instance service, running the image named portainer/portainer from DockerHub. A couple of bound volumes are required for logging purposes. The
--constraint option says that the the service has to be ran on the leader node.In order to use portainer, we need to have our leader node IP address. This is done using the
docker-machine command.echo -e "tVirtual Machinesnt---------------"
docker-machine ls
Now, going to http://192.168.99.100:9000 and logging in as a new admin user, we'll have the choice between a remote and a local connection. Choosing a local connection we'll gat on the dashborad page:

As you can see, a lot of options are present here and you can ispect all the swarms, nodes, services, stacks and containers. You can interactivelly create other new ones or remove existent ones. Cicking on the "Go to the cluster visualizer" link on the dashboard, will present you with the following view:
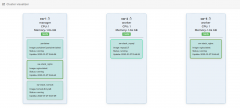
As you can see, there are here thre nodes, named sw-1, sw-2 and sw-3. Sw-1 is the leader and sw-2 and sw-3 are the workers. The node sw-1 runs an instance of nginx, one of the Tomcat app server as well as the Portainer itself. As per sw-2 and sw-3, they are running a MySQL and, respectivelly, and nginx instance. You can stop, the services, restart them or scale them up and down by using the buttons "+" and "-" to add new instances or remove existent ones.
The code in this blog post may be found here: https://gist.github.com/nicolasduminil/cb6aad75fc0212c1e7e55d39ac07ac0f. Beware that while the GitHub GIU doesn't allow you to use branches for GIST, there are however different branches here, that you can use with the GIT command line client. Enjoy.